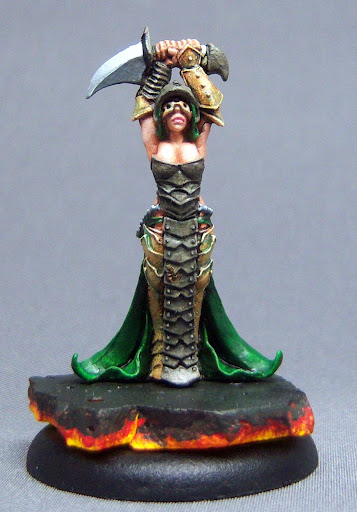
 Well, it's about time I got around to this. Today I decided to tackle finishing up a big batch of lava bases for my impending Cryx infantry. So, while working on this project, I snapped some pics (some of which aren't so great unfortunately), and present this how-to on making lava bases.
What you'll need:
* An old WM blister pack
* Hobby knife
* Drywall joint compound (available at hardware and home improvement stores)
* Green stuff
* Bases
* Paints (detailed below)
* Pliers
Getting Started:
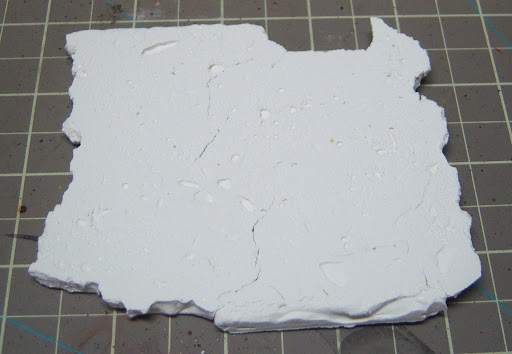 The first big hurdle is to create some pieces of joint compound that you can break up into lava rocks. First, take your old plastic blister pack and cut the back part off. You want to use the back part as a tray for a mold. Next, fill in the "mold" with drywall joint compound. It's not important to fill it in perfectly, just to get it pretty well filled in and decently smoothed out on top. Let this sit out in the sun for a day or two until sufficiently hard. It's very important that it completely dries out, otherwise when you start breaking it into smaller pieces it will simply crumble into unusable parts. Once it dries, you can pop it out of the mold and you should have a nice rectangular piece.
Assembly:
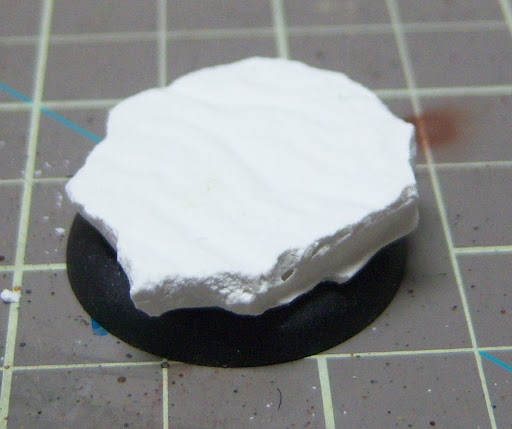 Next, start breaking it into smaller pieces. I keep a base handy for sizing the pieces as I break them. The goal is to have a piece that covers the inset top of the base without sticking out too much. I use needlenose pliers to help break the pieces more accurately. It's good to keep it somewhat irregular to make it look more natural. Once you have your broken piece for a base, mix up some green stuff and use it to attach the piece of compound to the base. Make sure to squeeze it down well, but not so hard as to break your piece of compound. Let this dry appropriately.
 There's definitely an economy of scale here. Today I was making 21 new bases to save myself time. Since there's a lot of time spent waiting for things to dry, mixing green stuff, and painting layers, it becomes easy to make a bunch at the same time once you have the hang of it. I've got 2 full squads of Cryx models that will eventually need bases, so this seemed like an appropriate amount to make.
Painting:
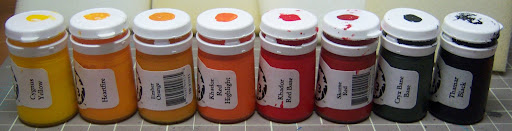 Ok, time to start painting. Here's the spread of colors I use. I've arranged them in the order that I use them. I'm using the P3 line from Privateer, but any line of paints will do. The key is to have a decent spread of colors. The compound takes paint well on its own, so there's no need to prime it beforehand. I just paint right over it, and the white base color helps a lot in this project. I start with the yellow and move towards the darker range as I go. Basically, the first pass is just laying down a good swath of yellow along the side of the compound. Then the next few colors are a combination of drybrushing and rough shading.
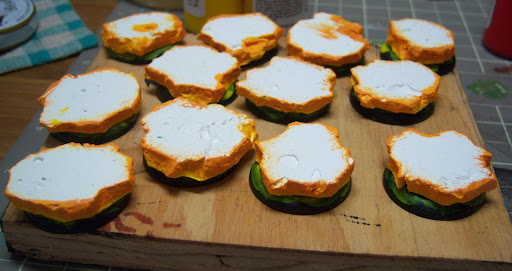 Now, when you get about halfway through, you're probably going to feel like I do and say to yourself "Where the heck is this going? It isn't looking very promising." Especially if you do like I do here and only paint the sides, leaving the tops white. It doesn't look very impressive and it's easy to get disenchanted with the process. Just stick with it. Your patience will be rewarded.
 The transition from orange to red can appear pretty abrupt, as you can see in this comparison shot. I use extra care once I reach the first red step to make sure I am accurate with where the paint lands. It's important to keep the band of glowing lava pretty thin, otherwise it will look like whoever is standing on the rock is about to get themselves burnt to a crisp.
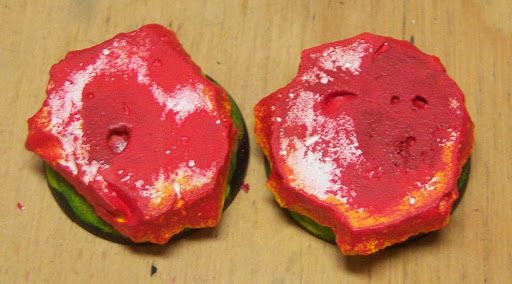 If the pieces of compound you selected had bubbles or cracks in the top, such as these, you can fill them in with some of the orange and red shades to give the look of lava in the pits of the rock. This is why I mentioned not to fill in the mold too perfectly. These sorts of irregularities can really add to the realism.
 Just keep working up until you get to your rock shade. In my case, I've used Cryx Bane Base. I like it due to the slightly greenish shade which helps offset the orangish colors of the lava. At this point I like to make sure that the rock color is spanning at least one third of the side of the rock, then I paint the top as well. Once this base coat of the rock color is done, I give it a wash of black, then drybrush again with the base color. And there you have it!
It's important to note that these bases, although relatively sturdy, are not indestructable. When you drill a hole for a pin, make sure to let the drill bit do the work. Too much pressure and you could cause the compound to crack, ruining all your work.
No comments:
Post a Comment